
A Lot of Words About Fingers
“Have you ever seen a route which looks like a hangboard? The muscle system in climbing is so complex, which means that your training needs to be extremely versatile. I’ve seen amazingly strong climbers doing crazy things on a campus board, but when they go on the wall it looks like their whole upper body is detached from the lower part. You need the connection all the way from the tip of your toes to the edges of your fingers.”
*I’m hesitant to refer to the list of training methods below as a spectrum of finger strength because I don’t believe that it’s simply finger strength that results in better performing hands in climbing. Things such as rate of force development, direction of pull, stability through the kinetic chain (wrist, elbow, shoulder, and possibly midsection), effort, quality of connective tissue, and forearm endurance/strength endurance also play a very significant role in transferring force into the rock for the duration of a climb. For the sake of brevity, I’ll be referring to overall hand performance on rock as finger strength for this post. It is important to keep in mind that there are more factors to this than strength.
For many of us, we will hit a point where climbing the way that we do now won’t continue to make us stronger. While strength shouldn’t be the sole avenue for improvement in climbing, it certainly helps. If you want to improve a weakness in climbing, your first step should be to try to use climbing to fix it. Using climbing as a tool for improvement should take priority over all other methods. All other methods for improvement should be seen as supplemental. You wouldn’t eat a diet made up only of vitamin supplements. You shouldn’t have a climbing routine made up only of training supplements.
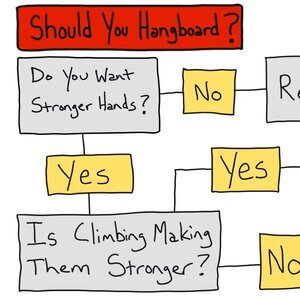
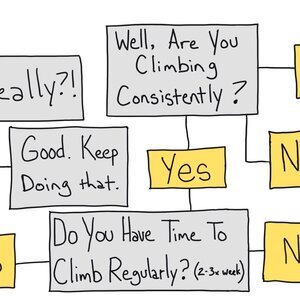
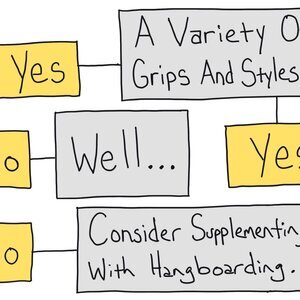
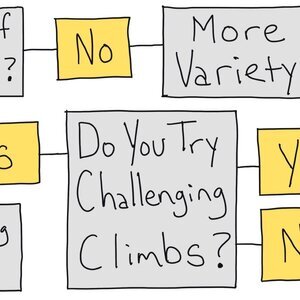

If you want to improve, the best place to start is with your climbing. Once you feel like you are putting quality effort and consistency into your climbing, it’s worth considering supplemental strength training for your climbing.
This post will be covering some of the things I consider as a coach when programming supplemental finger strength work for my clients. The exercises listed will be in order from least climbing specific to most climbing specific.
The purpose of this is to give people more fundamental information to work with when considering how to program their own training. Most rock climbers are self coached. With the amount of information that is available about training it can be easy to get overwhelmed or to unknowingly follow what is popular because it’s what you see happening around you. We should have a reason for the things that we do with our training.
With this post, I’m not trying to demonize or glorify any exercises. My goal is to share information with this community to help them make more informed choices and to possibly give a different perspective.
It’s normal to decide what type of training to do based on what is popular at the moment. We are all guilty of this. Examples of this range from doing lots of repeaters, max hangs, one-arm hangs, campus boarding, moon boarding, or anything else you see on social media. However, I don’t think training decisions should be based primarily on what you see most often. There are many ways to achieve great results in hand strength. Because of that, I put together this following list to provide more depth to the reasoning behind many common finger training methods.
The different methods are listed starting with least climbing-specific exercises and move towards most climbing-specific. When looking at this chart, it’s important to keep in mind that more specific is not inherently better than less specific. It could be argued that because the less specific exercises tend to be done in more control that they can be more safely performed at a higher intensity. This would allow the athlete to build base strength with less involved risk. These less specific exercises are also easier to measure progress with. For these reasons, among many others, I don’t believe that one method is necessarily better than the rest or that someone should only focus on one of these methods at a time.

Graphic by: Dale Wilson
Remember, climbing is a skill sport. Both developing hand strength and becoming a more skilled climber should be seen as crucial ingredients to climbing harder. Too much time spent developing hand strength will take away from the time and energy you can devote to climbing. Finding the right balance is more important than what specific protocol you use.
Generally speaking, less specific work should be programmed further away from your climbing season or planned performance period. As the season gets closer, your training should become more specific to your goals. During your climbing season, performance should be prioritized. Continuing with a light to moderate amount of strength work at this time can go a long way towards preserving the strength that you developed during the training season.
Moving up or down this spectrum can be a good way to break through a sticking point in finger strength development. For many people, novelty can also be fun. There’s value in keeping things entertaining if it makes you more consistent and motivated.
Specificity is important, but so is finding the right exercise for your available time, equipment, experience level, and ability to recover. Training on a spray wall might check a lot of boxes for you, but if you have a busy schedule and it’s an hour drive to the closest gym that has one then your time might be better spent elsewhere.
For the same reason that a climber can’t rely on doing dumbbell forearm curls to make our hands stronger for climbing, they also can’t rely on using other methods further along this spectrum, like hangboarding, as their only tool for preparing their hands for climbing harder. Developing a base of general strength is important, but without moving down the spectrum to more specific exercises, a climber will miss out on having the best carryover from their training into their performance.
Final Note: This list is not exhaustive. There is a lot of nuance in training methods and climbing walls, and to cover every situation in this article isn’t possible. While I don’t believe anything here is ground-breaking, I hope that having all of these listed out helps to bring clarity or some insight into your climbing training.
The following methods are ordered from low specificity/more measurable to high specificity/less measurable.
Direct forearm strength/conditioning work: (Such as rice bucket or dumbbell/barbell curls and wrist work)
Not specific, but can be useful for very general strength or hypertrophy work. Should be seen as accessory work to more specific exercises. Can be very useful during times of finger injury, for managing elbow or wrist issues, or during the off-season. It could be argued that strong wrists are useful for bouldering where hold orientation tends to be more strange or extreme.
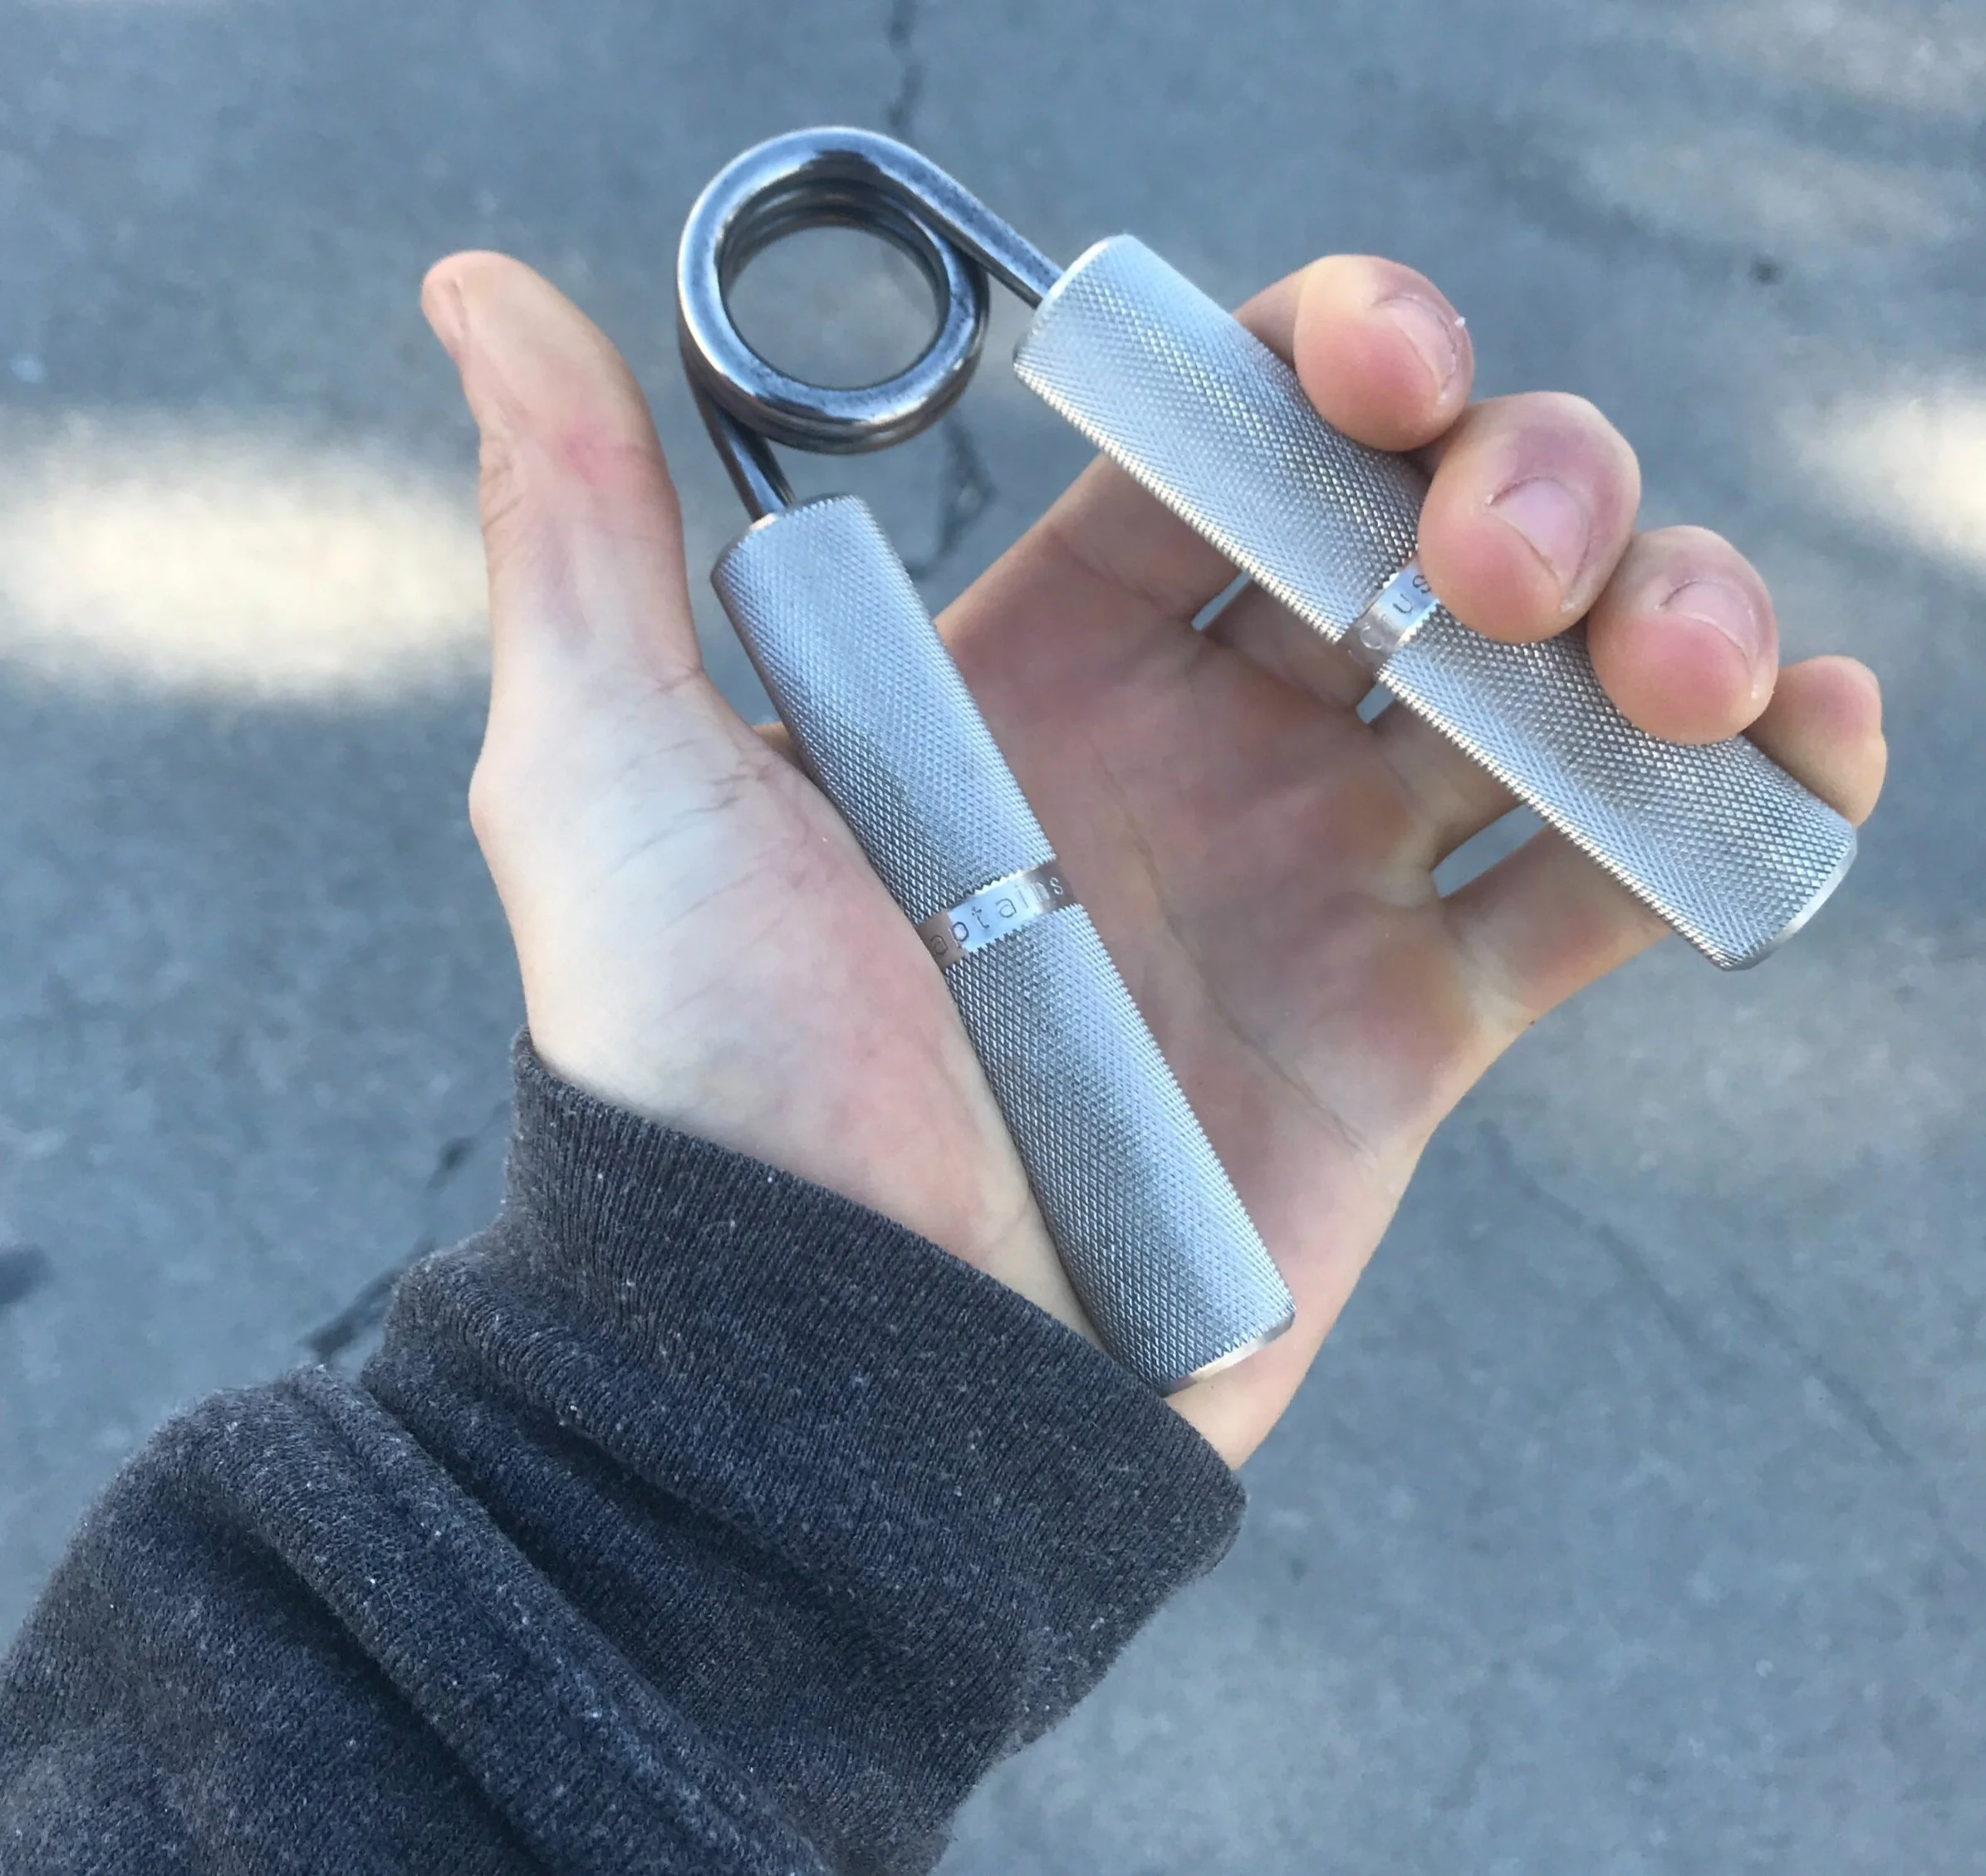
Grip Trainers: These are considered best for developing “crushing” grip strength rather than static strength like what is perceived to be used in climbing. There is no current evidence or history of use that suggests these have much carryover to our sport. It can be used in the off-season, as an accessory exercise, or if no other option is available. Even for general strength work this method is not currently recommended.
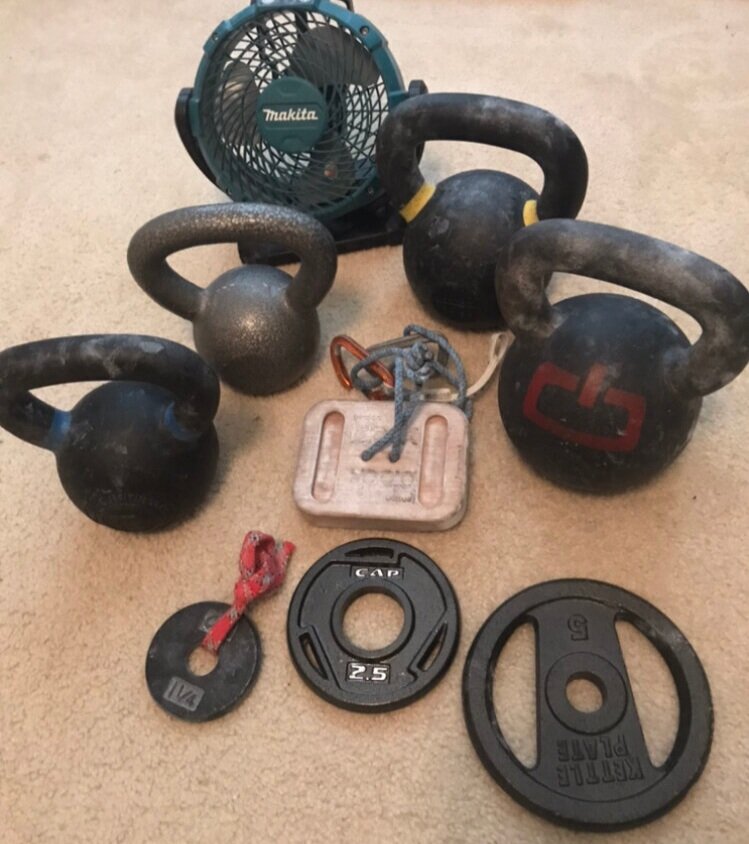
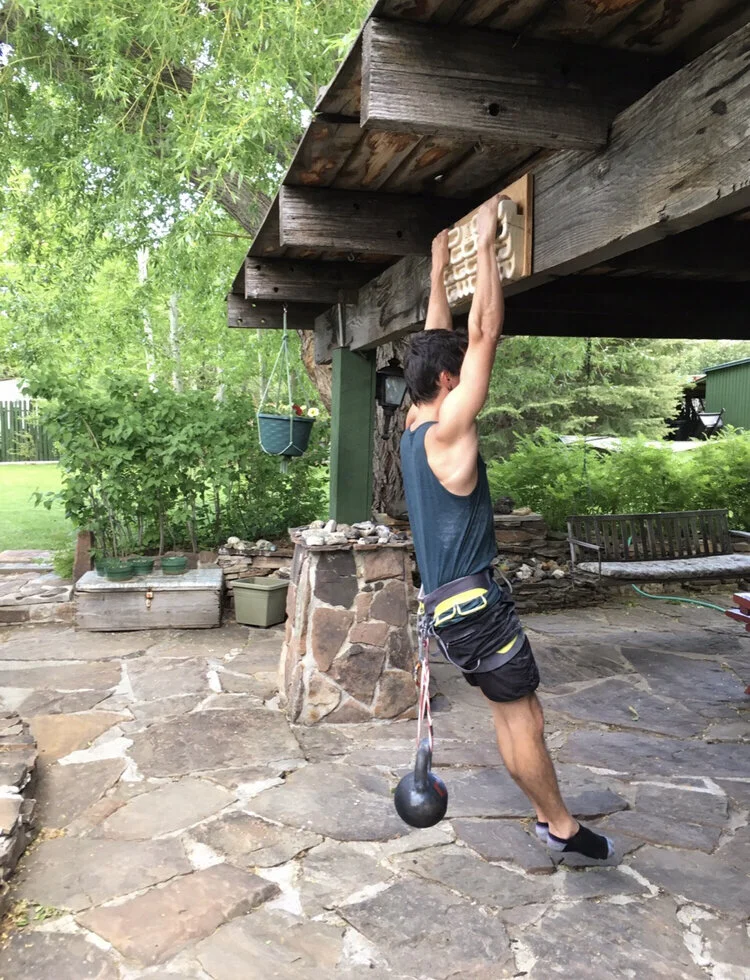
No-hang device (arm at side): This is the first exercise on this list that uses the fingers the same way that they are used in climbing.
It is very easily loadable (easy to adjust the weight), especially for very weaker grip positions where hangboarding with weight taken off would require a tremendous amount of reduced weight (e.g. closed crimps or monos).
In the early stages of finger injury recovery this is my favorite tool for reintroducing stress to the fingers. It is incredibly controlled, moderating the added weight is quick and easy, and you can easily measure progress.
This method hasn’t been as widely used as most of the others, so knowledge about it is still fairly new. It’s been observed that people aren’t able to generate as much force with this method as they can with a single arm dead hang from a hangboard. Even so, of all of the methods that stress the fingers in the same way that climbing does, this is the least stressful on the shoulders. With climbing being a sport that revolves around strenuous overhead movements, this method can be a very valuable tool for managing the total volume of stress placed on the shoulders during climbing and training.
Another benefit is that this is the most mobile finger training tool making it the easiest method to use regardless of someone’s available equipment. This is great for people who travel often or those who don’t have consistent access to a hangboard or climbing.
Lastly, if you are only worried about training your fingers for a session, it’s been observed that warming up to the levels of weight used for working out is considerably faster with no-hangs than with a hangboard. My guess for this would be because you don’t have to warm up your entire upper body like with hangboarding, but instead, just your forearms. This makes this method worth considering for those short on time.
My favorite device for this type of training is the Tension Block.
Hangboarding: Two-Arm Max Hangs: Traditionally performed for single reps separated by long rests (2-5 minutes). While there are no hard and fast rules, this method is commonly performed for anywhere between 3 & 15 seconds at 70%-95% effort. Common methods for increasing the difficulty include reducing the size of the hold, adding weight, or a combination of the two.
This is the first method that stresses the fingers while hanging with the arms overhead and relying on the shoulder girdle to support the hanging position. Two-Arm Max Hangs are one of the most well known methods for developing finger strength, and a very time efficient method as well. For those new to hangboarding, this is a great first step because of its simplicity and brevity. While hangboarding isn’t incredibly sport specific and shouldn’t be seen as a replacement for climbing it is great for people who don’t have time to climb more than twice a week.
My favorite hangboard for both comfort and range of usability is the Tension Grindstone MK2.
While this method has been around for a long time, it’s popularity grew dramatically after the release of Eva Lopez’s research using this method.
Hangboarding: One-Arm Max Hangs: This method might be tied with repeaters for where is should exist on this list. My reasoning for this is that repeaters allows you to be more specific metabolically (matching the time on and off of holds during a hard sequence), but one-arm hangs better replicates how you engage a hold while climbing.

While climbing, It’s much less common to pair both hands on a hold and dangle straight-armed off of it than it is to hit a single hold and have to engage it while your other arm is somewhere else.
One-arm deadhangs add more stress to the shoulder than two-arm hangs. While that doesn’t make it inherently dangerous, it does mean that many people will need to keep in mind the balance between stressing their hands and stressing their shoulders.
One-arm hangs prevent you from using compression strength to hang on the way that you can with two-armed hangs. For most people, one-arm hangs require the use of a pulley and weights to assist the hang. While that isn’t a huge hassle, not all gyms have this setup available which can make the exercise harder to load correctly.
Reps and sets tend to be similar to two-armed max hangs. It is common for one-armed hangs to have a shorter hang duration though. Three to seven seconds is more commonly seen.
One arm hangs were initially popularized by Chris Webb Parsons in this video where he talks about not only the hand benefits but also the benefits of hanging at different elbow angles.
Hangboarding: Repeaters, Two armed: *While one-armed repeaters are a valid training method, they are heavily dependent on upper body strength and make creating the ideal loading for the hands challenging for a large population of climbers.

This method allows the athlete to better replicate the time under tension that occurs during climbing. While a max hang can develop top end strength, even the shortest boulder problems require a climber to do more than hang off of a single edge for 10 seconds without moving.
It’s currently believed that the higher volume that generally comes with this method will create structural changes in the forearm where benefits from max hangs come predominantly from neural adaptation. This is not an exact rule, but more of a generalization. Both types of adaptations are necessary for long term development of finger strength.
If you want to learn more about this you can listen to Kris’s interview with one of the worlds top finger strength researchers, Eva Lopez, in episode 118 of the podcast.
Repeaters tend to be the most time consuming and physically exhausting protocol for hangboarding. The classic method has one set comprised of 7 seconds on, 3 seconds off, for 6 hangs. It’s not unheard of for people to do three sets for as many as seven different grip types.
Compared to the previous hangboarding methods, this one is more challenging to pair with a climbing session. It can be done, but it’s much easier to overdo than with the shorter hangs.
For climbers who can’t get to the gym and still want to train strength endurance, this is a commonly used protocol.
Popularized by the Anderson Brother’s blog series and later book Rock Climber’s Training Manual.
Pull ups on edges: (where the fingers are the primary focus of how much weight is added and not the pull ups). This is the first of the exercises where the fingers are placed under a pulsing load rather than a static load. Examples of when pulsing happens in climbing include the moment right after latching a hold, strenuous foot moves, changing body positions, stopping to clip or chalk, and the stress on the grasping hand when a climber releases the other hand to reach and grab the next hold.
This is an often overlooked exercise because at first glance it seems like an inefficient use of time because it doesn’t stress pulling strength as much as weighted pull ups would. While there is value in isolating different aspects of the strength needed in climbing, there is also a large benefit to compound movements such as this. For many climbers, the value of developing hand strength while moving on bad holds and withstanding the pulsing that happens when changing directions at the bottom of the pull up more than makes up for the sub optimal pulling work. If a climber is looking to maintain pulling strength while putting their focus into developing finger strength, this would be a good option to consider.
Another benefit of this method is that the fingers never leave the hold that they are on. This makes edge pull ups considerably more controlled than the the other pulsing exercises below where the climber must move between holds and risk grabbing holds poorly.
Campus boarding: *heavily dependent on upper body/shoulder strength*
For many climbers it’s very challenging to find the correct level of difficulty on the campus board when considering finger strength development. While there can be great benefits for coordination and pulling strength, that goes beyond the scope of this list. It’s important to note however that the climber’s ability to control and coordinate their pulling has a dramatic effect on the force needed from the fingers to control the destination hold. It is because of this that pulling strength and coordinating timing should not be overlooked when considering the shortcomings in a climber’s finger strength related performance.
This method has a lot of potential, but a high barrier to entry. For the right person at the right time, this is a fantastic tool for supplemental strength. Experienced climbers with a good foundation of strength and who are currently healthy tend to see the best results from this method compared to other groups of people.
Because campus rungs are wide and ergonomically shaped, being powerful on them is more controlled than if a climber is lunging between precise, awkwardly shaped holds like what is found outdoors. This lowered technique ceiling allows climbers to put more of their focus on being powerful.
This is the first exercise where “contact strength” comes into play. With all of the previous exercises, the climber pulls onto the hold slowly and statically. In this case, you are having to latch the hold while moving. This improves the ability to develop force quickly through the fingers when coming in contact with a hold. While climbing near our limit, it is very common to have to grab holds very quickly before we fall away from the wall. A climber’s ability to generate force quickly through their hands is a crucial skill during powerful and desperate climbing or climbing that’s done when moving statically is no longer possible due to fatigue.
This method was popularized by Wolfgang Gullich when he used it to train for Action Directe, the worlds first 14d.
Foot on Campus boarding: Compared to campus boarding, this can be more easily loaded and unloaded to tailor to the specific needs of the athlete. Because feet are used, it can also fit longer duration protocols better than campus boarding (think endurance and power endurance work). Having feet on also allows for the use of different grip positions than what would be possible while campusing.

Foot on campus boarding shares campus boarding’s benefits of having a low technical threshold and being good for developing contact strength, but the use of legs allows you to replicate a wider array of movements than with regular campusing, and makes the campus board a more approachable tool for less developed climbers.
This method was popularized by Steve McClure. The Climbing Bible even refers to it as The McClure Method saying, “This method gets its name from British climbing legend Steve McClure, who uses it as one of his exercises to prepare for hard and intense redpoints and on-sights.”
Campusing boulders: Compared to a campus board, this allows for a broader grip variety, different wall angles, and moving in directions other than straight up and down. This means less controlled movement which demands more from the hands. However, by not using feet, you lose access to a lot of grip types and sizes such as underclings, many sidepulls, pockets for those who aren’t very experienced, and very poor holds. This is a popular method for developing upper body power for more advanced climbers.

System board: (controlled climbing on specific grips and movement patterns. Think laddering on a wall that is set symmetrically with training in mind. This is the first method that involves climbing full sequences with hands and feet.
A system board, as I’m using the term here, allows to repeat similar move types and holds. The benefit of this is that it allows the climber to pick a style of hold or movement and focus specifically on that. For a climber who has a good grasp on what their weakness is (Ex: Deadpoints to crimps, lock offs on gastons, wide pinches, etc), and is willing to take a methodical approach to addressing it, this is one of the better tools available. However, it tends to lack the movement variety that you get from the other types of climbing listed here.
The System Board was popularized by Alex Huber and his coach, and lead to his famous quote “I have power to waste”. Kris wrote several blogs on the system board over the years and went so far as to build his own in the Engine Room (the wall that preceded the Machine Shop). This is still probably one of the most powerful tools for isolating weaknesses directly with climbing.
Gym bouldering
Commercial setting- This offers the broadest range of movement, hold types, and wall angles for indoor climbing and training. Some would argue that the range goes beyond the necessary scope for people who’s end-goal is climbing outdoors. I believe that’s too extreme of a statement and doesn’t take into account how unique outdoor climbing can be.
Holds and moves in commercial setting tend to be more ergonomic than with climbing on boards, spray walls, or outdoors. Route setters put a lot of care into setting climbs that have the lowest chance of injuring people as possible while still providing an enjoyable challenge. The nature of this style tends to allow for a higher volume of climbing than the methods further down the spectrum because of its less aggressive holds and movements.

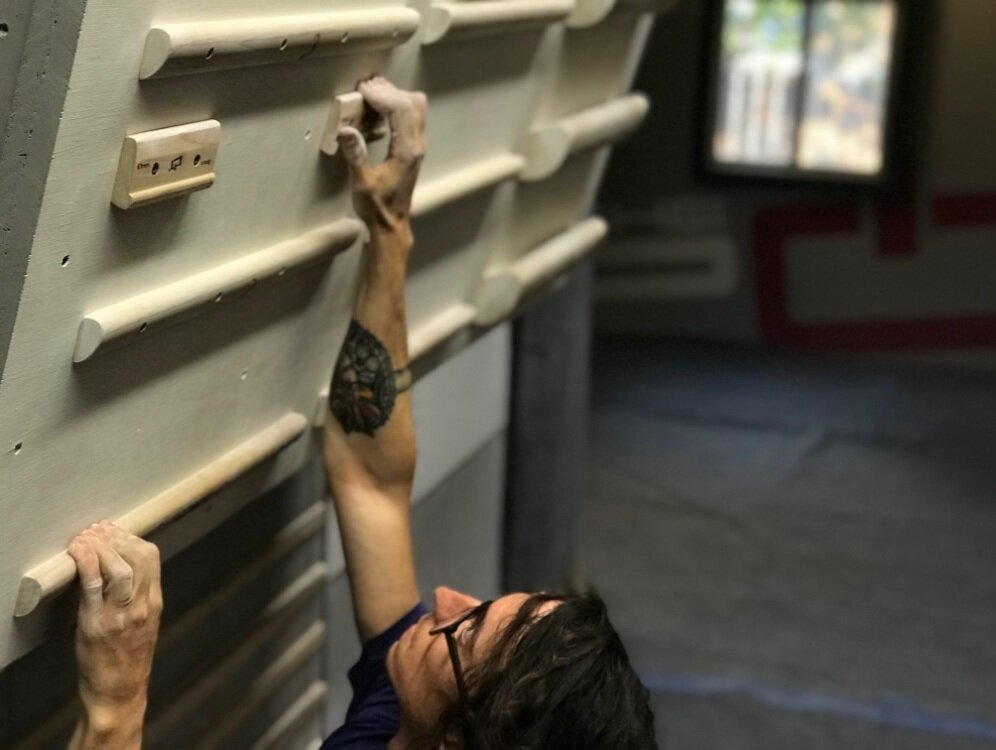
Board climbing/Spray wall(link to podcast) This ranges from pre-built walls like the Tension board, Moon board, or Kilter board to self-made spray walls that are littered with holds to be used for making up problems later on. The traditional goal of these walls is to create distilled difficulty that lets the climber use severe handholds and footholds to best replicate the demands of outdoor climbing. Most boards have a fixed angle and holds that don’t get changed. Holds and moves on these types of boards tend to be more aggressive than with commercial setting. Having more strenuous moves and holds makes for a potent tool that, when used while well-recovered and with a high intensity, can bring great carryover to overall climbing performance.
While a great tool, it tends to lack the three-dimensional movement variety that you find with outdoor bouldering or indoor commercial setting. It’s for this reason that you should consider adding more types of climbing to your diet than just board climbing.

Outdoor Bouldering: Whether someone sport climbs, boulders, or trad climbs, this is their sport distilled to its most powerful version. If the strength gains seen in methods above carryover to this then they hit the mark. If a climber’s goal is to perform better outdoors in a way where strength is required then this is the ultimate measuring stick. The only one that matters compared to everything above
With outdoor bouldering, there is more variation in hold type, wall angle, texture, and movement than with other forms of climbing. These factors change dramatically from place to place. While outdoor bouldering offers a lot of variance, single areas can often be very narrow in the styles that they offer. If outdoor climbing is your end goal then experience on rock is invaluable. Many coaches have said in the past that traveling and climbing in new areas to experience their styles and the lessons that they offer is one of the best ways to improve at climbing.
This is the only method on this spectrum that isn’t man-made. While that seems obvious, it is important to consider. Unlike with indoor climbing and training, these holds and movements were not designed to be used by humans. Holds can be sharp and uncomfortable, and the moves can put your body into extreme positions. This doesn’t mean that outdoor climbing is inherently injurious. As the saying goes, the difference between medicine and poison is the dose. This is true for every item on this list. Every method is “dangerous” if it’s overused, and every method can be safe if used at the right volume and intensity and with sufficient rest.
Make good choices.
Lastly, if you’d like to see Kris’s interpretation of these concepts when applying it to contact strength, I highly recommend this video he recently put together.


Nate provides more depth to the reasoning behind many common finger training methods.