
How To Toe Hook: The Most Misunderstood Climbing Technique
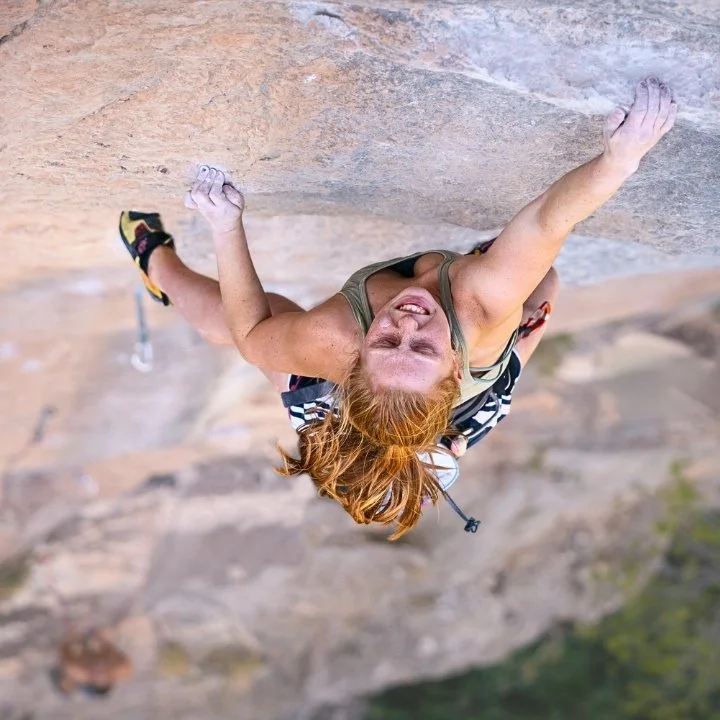
I consider toe-hooking to be a superpower of mine. Nearly every double digit boulder I’ve done has involved a toe hook. Partly because I can use my toe hooks in the same way that some people use heel hooks, and partly because I don’t often find the toe hook to be the crux that others do.
This is largely because I spent an entire training season focused on learning to use toe hooks because I was terrible at using them and even worse at spotting them. Over that season I learned how technical toe-hooking can actually be.
For our Atomic Elements of Climbing Movement course, I wanted to focus on the general principles of movement, knowing I’d eventually dive deeper into individual techniques. I’m starting with toe-hooking because:
Toe-hooking is very often misunderstood in two ways.
And these days I hear a lot of people lament the fact that they aren’t strong enough to do toe hooks, and they end up doing these tibialis workouts that ultimately do very little, if anything, to help.
So I want to first explain what those two misunderstandings are, how this confusion leads to toe hooks seeming harder and more like sorcery than other techniques, and finally, I’ll break down a few toe hook boulders so that you can see exactly how to apply better toe-hooking techniques.
Let’s get into it.
The first misconception comes from the name, because if you’re taking it literally, it might just throw you off.
Look at kneebars – I’ve seen dozens of climbers try to use their knees during a kneebar because they took the name literally. If it were called a thighbar, then maybe they would have gotten it quicker. Same with toe-hooking, though if we called it a dorsum hook nobody would have a clue what we were talking about. But I see people literally try to hook their toes onto things when what you should be doing is more of a foot hook.
The second misconception comes in what you actually do when you’re using a toe hook.
If you aren’t well-versed at toe hooks, then having a lot of options for placement makes it easy to get wrong. Anytime I see people fail at this, they act as if they want to go straight to those tib raises. They say they aren’t strong enough. But that isn’t true. You’re probably just going about it the wrong way. I’m not saying that making your shin muscles stronger is a bad thing, but in my estimation, it’s rarely the problem. Most people don’t need to get stronger. They need to get better. They need a better understanding of the move itself.
If I asked you which of these techniques toe hooks were more closely related to, heel-hooking or drop-kneeing, you’d probably say heel-hooking. And in some ways you’re right. But if we look at the why of choosing to use a toe hook, I might have to go with drop knees as the closer relative. Here’s why:
Heel hooks are really versatile and are regularly used two distinctly different ways: for stability and for propulsion. Drop knees are usually used for stability – to put your body into a specific space and hold it there while you move an arm. This is the same for toe hooks:
Toe hooks are usually used for stability – holding your body in position while you move an arm or your other leg. As such, they are rarely about applying more force, particularly when learning them.
In situations that heel hooks are used for stability, they are often interchangeable with toe hooks. I nearly always choose the toe hook over a difficult heel hook when used in this more static manner, but that’s me personally – doesn’t make it better for everyone.
This versatility of heel hooks and the fact that we think toe hooks and heel hooks are so similar is where many people get tripped up. Heel hooks are much more common, and when using a heel hook to move, we are actively pulling with the hamstring. It’s a movement we’ve gotten comfortable with. So naturally, when we place a toe hook, we actively try to curl our toes into extension and pull with them. We flex hard at the ankle and start pulling with the hamstring. And the toe hook holds for like two seconds and feels like it takes absolutely everything we have to keep it on.
Why?
Maybe because you’re actively trying.
Let’s get into how to improve your toe-hooking. We’ve already established that toe hooks are usually used for stability, so if you’re in a scenario where you need to keep your body from falling away, a toe hook can be helpful. This doesn’t need to be on super steep terrain.
Now, placement:
Some people will tell you that you’re looking for surface area contact: the more the better. And that’s sort of true, but it might not work how you think it does. It’s more like you’re trying to fit a puzzle piece into a void. Your shoe has a certain profile. Different shoes have different profiles.
What you’re looking to do is fit the profile of your shoe onto the hold.
As with any other foot technique, some shoes are going to work better than others for certain toe hooks. To be perfectly honest, there are several toe hooks that I’ve done every time in one shoe that I’ve literally never been able to do in another shoe, and obviously I haven’t tried all shoes, but I know what works for me when I need it. However, I don’t want to oversell this idea. The vast majority of the time, it’s not the shoes that matter most. It’s the skill. The right shoe just allows me to apply the skill in a very limited, very specific context.
While we’re on the subject, wouldn’t a shoe with no toe bump maximize the surface contact and be better? Well, sometimes, maybe. But probably not that often. The toebump can actually be pretty helpful – as long as you aren’t overemphasizing it – for two reasons. Number one: it creates this concave space in what would otherwise be a mostly convex surface. Number two: if the toe hook is shallow, it might become the dominant surface area. If you can find a divot where that knuckle bump might land, even better.
But don’t get caught thinking that the toebump is what makes all the difference for every toe hook, because frankly, if it doesn’t have to be shallow, deeper can be a lot better – even if it means, as it often does, toe-hooking all the way up on the laces or velcro. If you overemphasize that bump in scenarios where you can get a lot more surface area on an appropriate surface, you might just be making it harder. Put simply:
Experiment with the placement – shallow or deeper, swiveled from one side to the other – and see what works. As you find different placements working, you’ll get better at recognizing what you need to do.
But what about the rest of your leg? What are you doing with that?
Well, I’m almost never actively pulling. It happens, of course, but most of the time we want it there for stability. I place it, stabilize it, and then move the rest of my body around it. Straight legs, if the geometry works, is best. Which means lowering your hips out to allow for the straightening and to let gravity pull against the toe. If it’s a closer toe hook, you might need to bend a little at the knee to hold tension. I find this easiest if I rotate my leg internally, sort of dropping my knee. Even then, usually, I try to hold that tension stable and move the rest of my body around it. Something to consider is that:
Difficult toe hooks are rarely just about dangling like you would in a bat hang – more often, they require some level of compression, some force opposing the toe hook.
Easier toe hooks can let gravity do this, or a bicycle can do it sometimes, but difficult toe hooks often require you to compress between the toe hook and the opposite hand. In these situations it might help to imagine that you’re trying to pull the two holds together. The strongest way to do this is to contract at the core like you would for a hollow body, rather than bending at the elbow or knee. This kind of compression can stabilize you and allow you to move the other foot or hand freely.
Now back to the idea of lowering your hips out. Particularly when it’s something like matching hand foot with a toe hook, this part is key.
A toe hook is usually not going to feel great until you lower your hips out and find a really stable position.
What you do with the other leg might be a big help with that. Sometimes opposing the toe hook with a bicycle works really well to allow you to let go and lean into it. Sometimes dropping a leg off and letting it help pull your weight onto the toe will give it the opposition it needs. These moments can feel really unstable, and will take some getting used to in order to anticipate where you’ll need to get to and how fast you can do it. You’ll only be able to anticipate it if you practice it.
But what if that stable position is great for staying on the wall, but isn’t really helping us get where we’re going?
Assuming you’ve created stability through your core and compressing, then oftentimes we can advance the stable position by using the other leg to sort of kickstand it, and we often don’t even need any kind of foothold for this – just a smear will work. The position is far more important than how good the foothold is.
Find the position and use the foot that works for it – not the other way around. What you’re looking for is the advantageous position that will allow you to reach the next hold.
If possible, making a sort of tripod with both legs straight is ideal, and it gives you the option to adjust with your kickstand leg, by lowering your hips out, and by either bending the pulling arm or just pivoting at the shoulder.
But even doing this, we’re usually just moving through relatively stable positions for that brief moment that we are reaching. Our lower body tends to make very little movement while our arms are moving.
Occasionally, you’ll need to use a toe hook and actively pull with that leg to make a move. In this scenario, I suggest experimenting with ways to pull without changing the positioning of the toe too much. Usually this is going to revolve around internally rotating your leg and pulling with your hip – again, like a drop knee.
Usually this happens when you’d rather have a heel hook but just don’t quite have the reach to get it there. Which brings me to an important point:
When where you are considering a heel or toe hook is distant, it might take more effort to pull yourself toward it enough to place a heel, so the toe hook might be easier to place. And if you’re traveling away from the heel or toe anchor position, a toe hook can give you more reach and is easier and less violent to release.
If you’re in a scenario where it’s hard to release, if you can reach back and find any kind of hold, no matter how terrible, to oppose the stabilizing hand – almost acting like a replacement for the heel or toe, the release will often be easier.
If you’re using the hook for propulsion, oftentimes the heel will give you more versatility and distance. But if the toe is easier to place and can get you the distance, it might still be the more efficient option.
To get better at all these things you’re going to have to practice them. Don’t wait for the toe hook boulders or for the setters to put up the perfect toe hook crux. Instead, substitute toe hooks whenever you find a stability-type heel hook or a drop knee. As you get better at recognizing when a toe hook will work for you, try making up harder versions of that. How do different holds change how you place the toe hook? How do different orientations change how you compress or turn your hips? If you have a home wall, make sure to have underclings and side pulls, otherwise you’re setting yourself up to not have many toe hook opportunities. Once you have the opportunities, explore them.
You can’t hack your way to improvement in these techniques. They take time and experience and awareness and intention.
If you want to go deeper into learning about and assessing your movement, check out this video about our Atomic Elements of Climbing Movement course or this playlist with more videos just like this one.
EXPLORE FURTHER
You might enjoy these related articles, episodes, and other resources:
The Atomic Elements of Climbing Movement
FOCUS | Q & A Part 2: Movement Solutions, Finding Better Beta, and Toe Hooks vs. Heel Hooks
CONFLICTED | Kneebarring on Boulders
Climb Your Project Sooner | The Art of Execution
Taped Tips | The Most Underrated Climbing Movement Skill
SUPPORT + CONNECT
Help us keep the show sponsor-free when you join our Patreon Community for as little as $3.
Get two or more bonus episodes every month on Patreon, Spotify, or Apple.
Subscribe to THE CURRENT and get a monthly exploration of how we can all become better climbers.


A better way to view grades and progression?